v2ray 部署 安装 1.从 github 站点 下载最新版本的 v2ray 压缩包文件到 /usr/local/src/ 目录:
2.将其解压到下载目录:
1 unzip /usr/local/src/v2ray-linux-64.zip -d /usr/local/src/v2ray
3.将解压目录移动到 /usr/local/ 目录下
1 cp -r /usr/local/src/v2ray /usr/local/
4.将 /usr/local/v2ray/ 目录下的可执行文件复制到 /usr/sbin/ 目录下:
1 cp /usr/local/v2ray/{v2ctl,v2ray} /usr/sbin/
5.将 /usr/local/v2ray/systemd/system/ 目录下的 v2ray.service 复制到 /lib/systemd/system/ 目录下
1 cp /usr/local/v2ray/systemd/system/v2ray.service /lib/systemd/system/
6.编辑 v2ray 启动脚本文件 /lib/systemd/system/v2ray.service, 将其修改为:
1
2
3
4
5
6
7
8
9
10
11
12
13
14
15
16
[Unit] Description=V2Ray Service Documentation=https://www.v2fly.org/ After=network.target nss-lookup.target [Service] User=nobody CapabilityBoundingSet=CAP_NET_ADMIN CAP_NET_BIND_SERVICE AmbientCapabilities=CAP_NET_ADMIN CAP_NET_BIND_SERVICE NoNewPrivileges=true ExecStart=/usr/sbin/v2ray -config /usr/local/v2ray/etc/config.json Restart=on-failure RestartPreventExitStatus=23 [Install] WantedBy=multi-user.target
配置 v2ray 1.在 /usr/local/v2ray 目录下新建 etc 目录:
1 mkdir /usr/local/v2ray/etc
2.复制 /usr/local/v2ray/config.json 文件到新建的 etc 目录中:
1 cp /usr/local/v2ray/config.json /usr/local/v2ray/etc/
3.编辑 /usr/local/v2ray/etc/config.json 文件,将其配置成:
1
2
3
4
5
6
7
8
9
10
11
12
13
14
15
16
17
18
19
20
21
22
23
24
25
26
27
28
29
30
31
32
33
34
35
36
37
38
39
40
41
42
43
44
45
46
47
48
49
50
51
52
53
54
55
56
57
58
59
60
61
62
63
64
65
66
67
68
69
70
71
72
73
{ "log" : { "access" : "/var/log/v2ray/access.log" , "error" : "/var/log/v2ray/error.log" , "loglevel" : "warning" } , "inbounds" : [ { "port" : 26609 , "listen" : "127.0.0.1" , "protocol" : "vmess" , "settings" : { "clients" : [ { "id" : "b5e88c22-2b65-11ee-9658-3d06e2715c03" , "level" : 1 , "alterId" : 64 } ] } , "streamSettings" : { "network" : "ws" , "wsSettings" : { "path" : "/tmp" } } } , { "port" : 22866 , "protocol" : "shadowsocks" , "settings" : { "method" : "chacha20-ietf" , "password" : "OXeUjl6g" } } ] , "outbounds" : [ { "protocol" : "freedom" , "settings" : { } , "tag" : "direct" } , { "protocol" : "blackhole" , "settings" : { } , "tag" : "blocked" } ] , "routing" : { "rules" : [ { "type" : "field" , "ip" : [ "0.0.0.0/8" , "10.0.0.0/8" , "100.64.0.0/10" , "127.0.0.0/8" , "169.254.0.0/16" , "172.16.0.0/12" , "192.0.0.0/24" , "192.0.2.0/24" , "192.168.0.0/16" , "198.18.0.0/15" , "198.51.100.0/24" , "203.0.113.0/24" , "::1/128" , "fc00::/7" , "fe80::/10" ] , "outboundTag" : "blocked" } ] } }
4.根据配置文件,我们还需要在 /var/log/ 目录下新建 v2ray 日志目录及文件:
1 mkdir /var/log/v2ray && touch /var/log/v2ray/access.log
5.赋予日志文件 777 权限:
1 chmod 777 /var/log/v2ray
启动 v2ray 1.执行命令 systemctl daemon-reload 加载 v2ray 启动脚本:
2.启动 v2ray 服务,并设置为开机启动:
1 systemctl enable --now v2ray
3.启动完成后,查看是否有监听到配置文件中监听的端口:
1
2
3
root@vultr:~ LISTEN 0 4096 127.0.0.1:26609 0.0.0.0:* users :(("v2ray",pid=357794 ,fd=7 )) LISTEN 0 4096 *:22866 *:* users :(("v2ray",pid=357794 ,fd=8 ))
反向代理配置 确保你在本机有安装好反向代理软件:nginx 或者 caddy2.
1.在 nginx 配置目录 conf.d 目录下创建 v2ray 反向代理文件,内容如下:
1
2
3
4
5
6
7
8
9
10
11
12
13
14
15
16
17
18
19
20
21
22
23
24
25
26
27
28
29
30
31
server { listen 80; listen [::]:80; listen 443 ssl http2; listen [::]:443 ssl http2; server_name your.damo.com; access_log /usr/local/nginx/logs/access.log ; ssl_certificate /usr/local/ssl/damo.com/your.damo.com.pem; ssl_certificate_key /usr/local/ssl/damo.com/your.damo.com.key; root /tmp; index index.htm index.html; if ( $scheme = http ) { rewrite ^ https://$host$request_uri ?; } location /tmp { proxy_redirect off; proxy_pass http://127.0.0.1:26609; proxy_http_version 1.1; proxy_set_header Upgrade $http_upgrade ; proxy_set_header Connection "upgrade" ; proxy_set_header Host $http_host ; } }
2.检测配置,
1
2
3
root@vultr:~ nginx: the configuration file /usr/local/nginx/conf/nginx.conf syntax is ok nginx: configuration file /usr/local/nginx/conf/nginx.conf test is successful
3.重载 Nginx:
4.在 /tmp 目录下创建一个 Index.html 文件,内容为:
5.打开浏览器,访问域名测试,如果能正常访问到 Bad Request! 则说明配置正常!
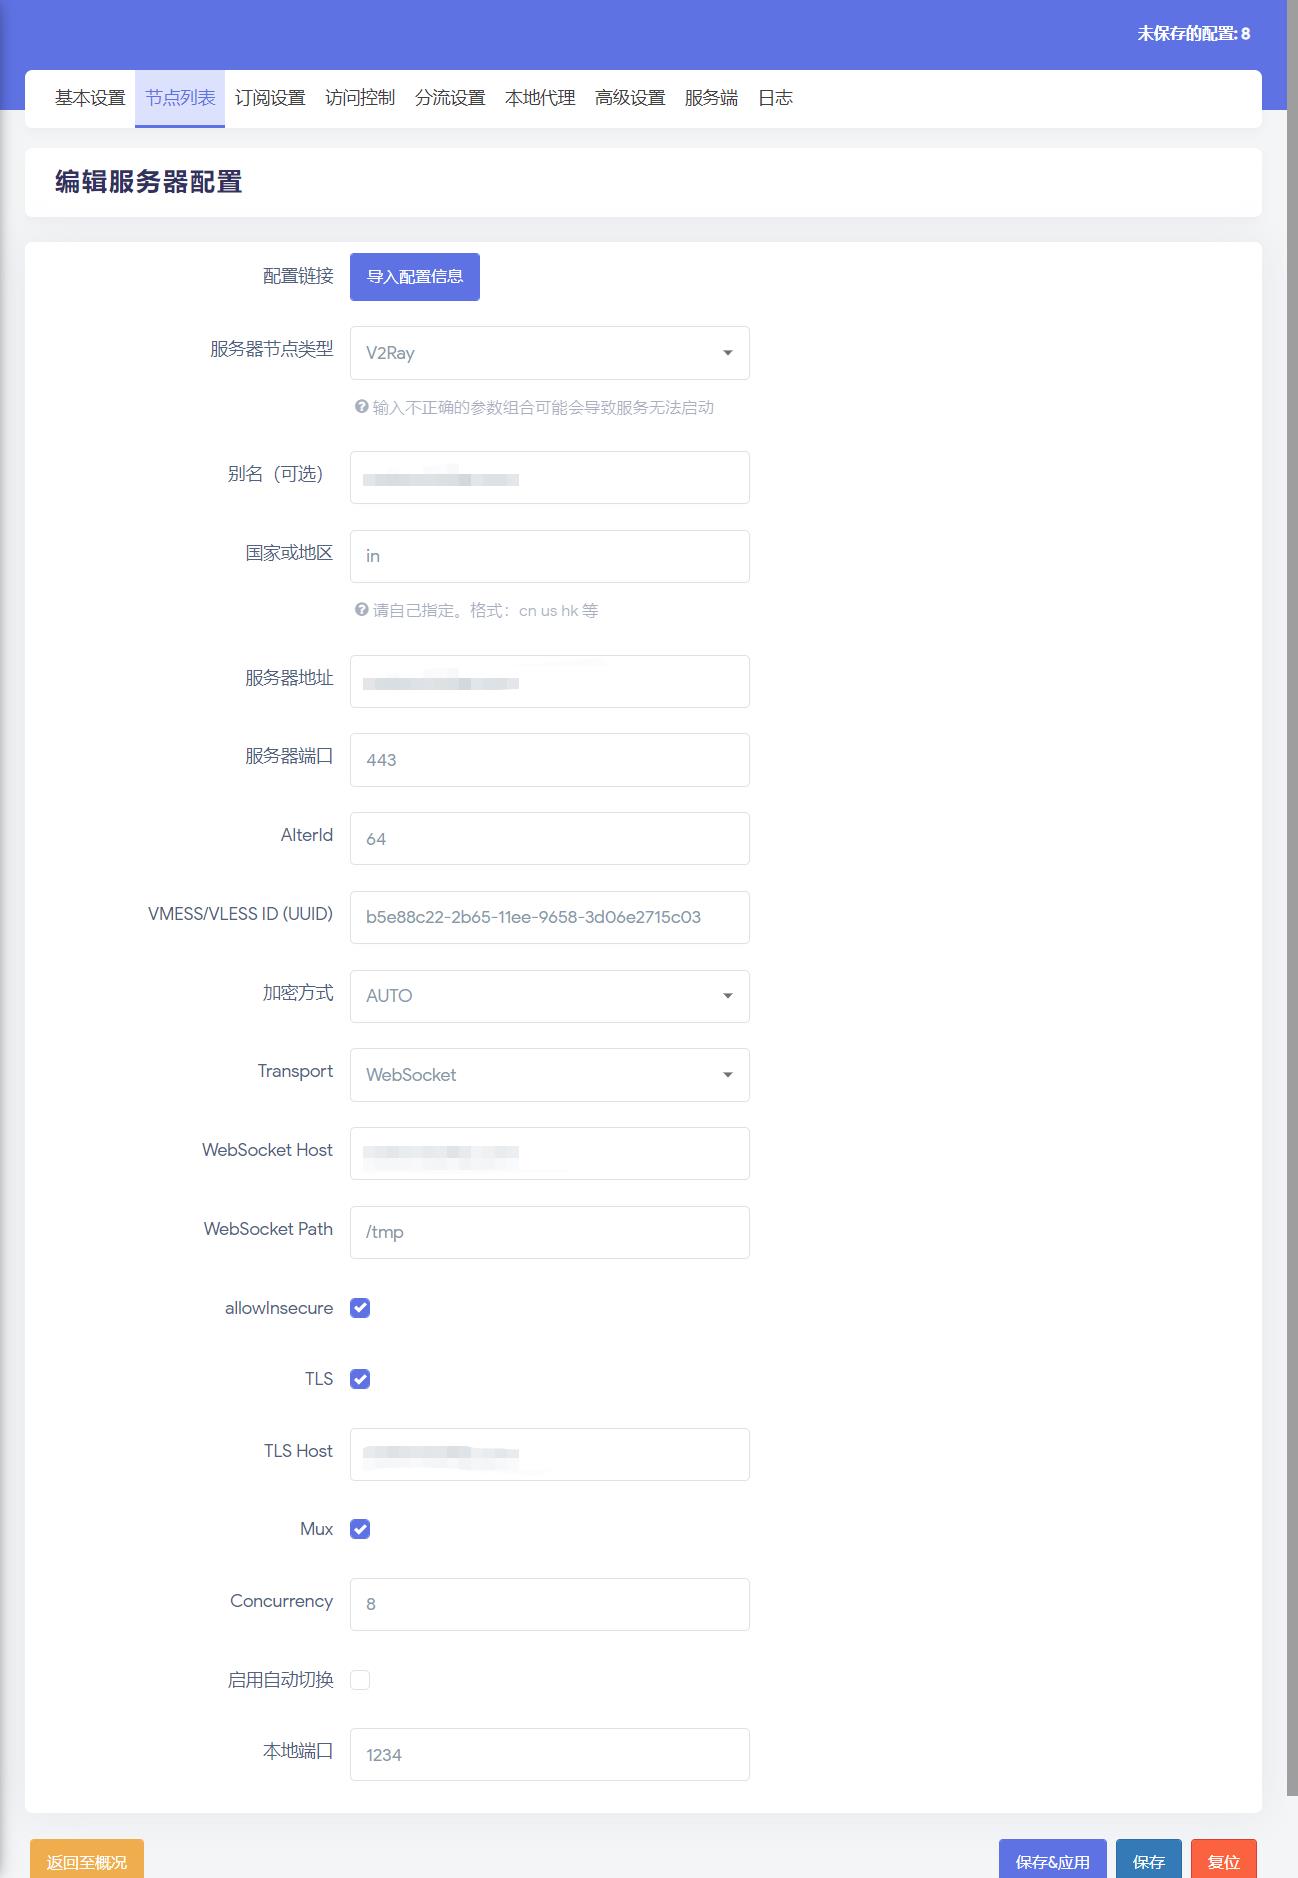
OpenWRT 客户端配置 配置如下:


