声明
本文章的本意是为 hexo 的友情链接的 volantis 样式进行图片截图
教程
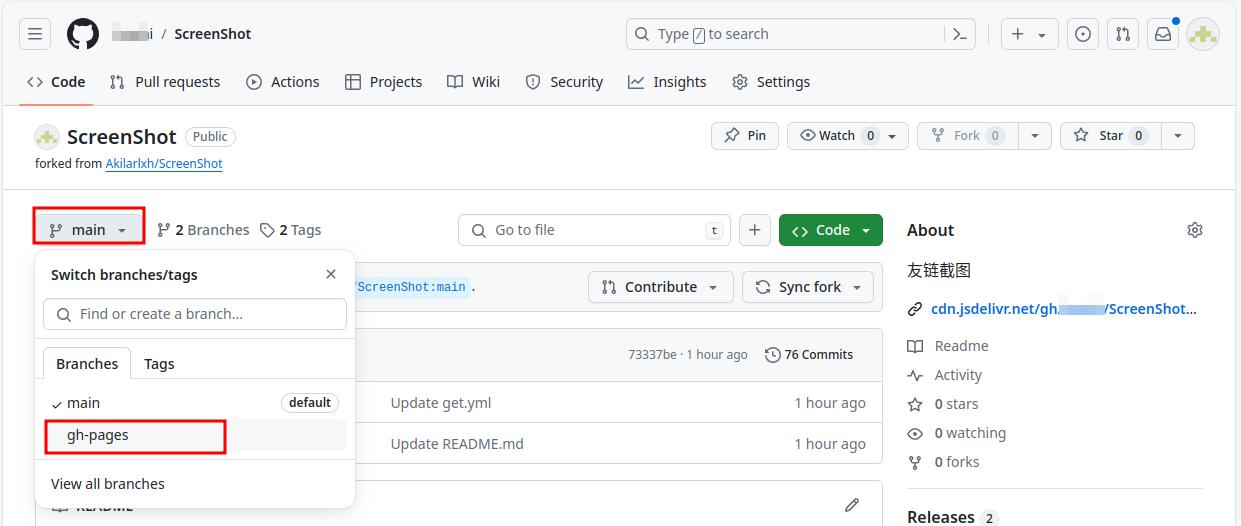
登陆你自己的 github 账号,将该项目 https://github.com/ChenYFan/ScreenShot fork 到你自己的仓库!
Token 生成
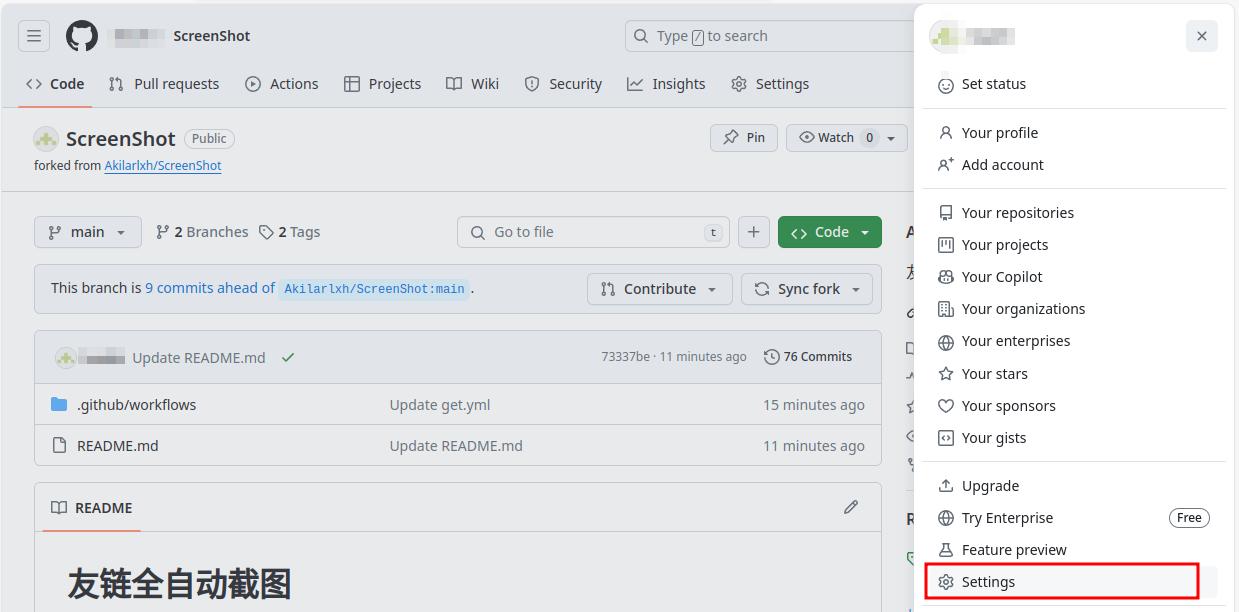
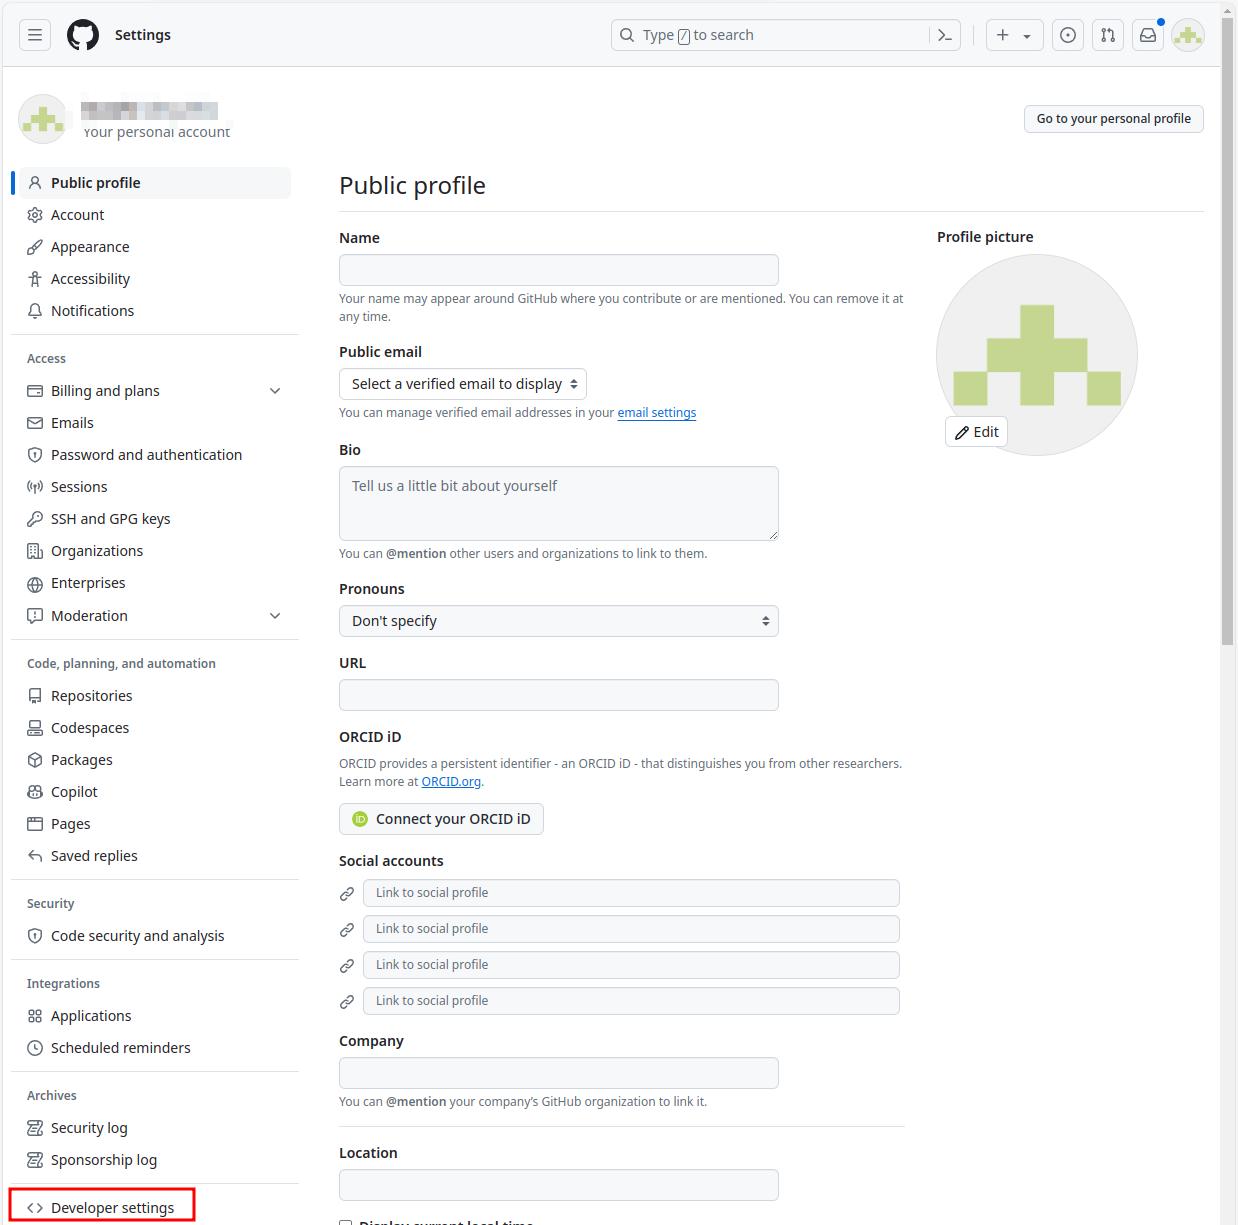
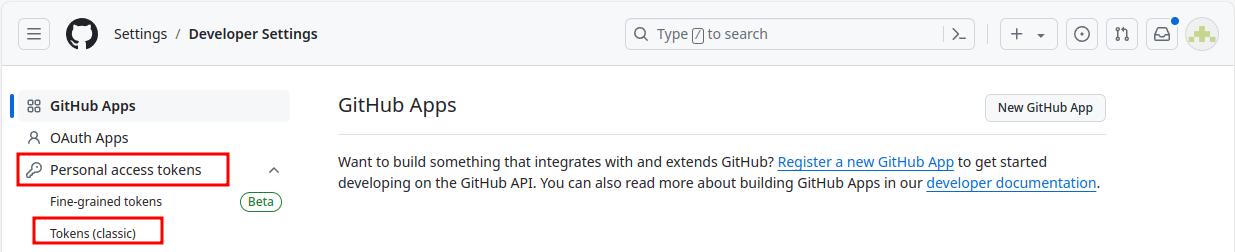
1.点击你登陆的 github 网页右上角 图像--->Settings--->Developer settings--->Personal access tokens--->Tokens(classic) ,如下图:
1.1.点击右上角图像并点击:

1.2.在弹出的列表框中点击 Settings,如图:
1.3.将页面下拉到最后,然后点击左侧最底部的 Developer settings,如下图:
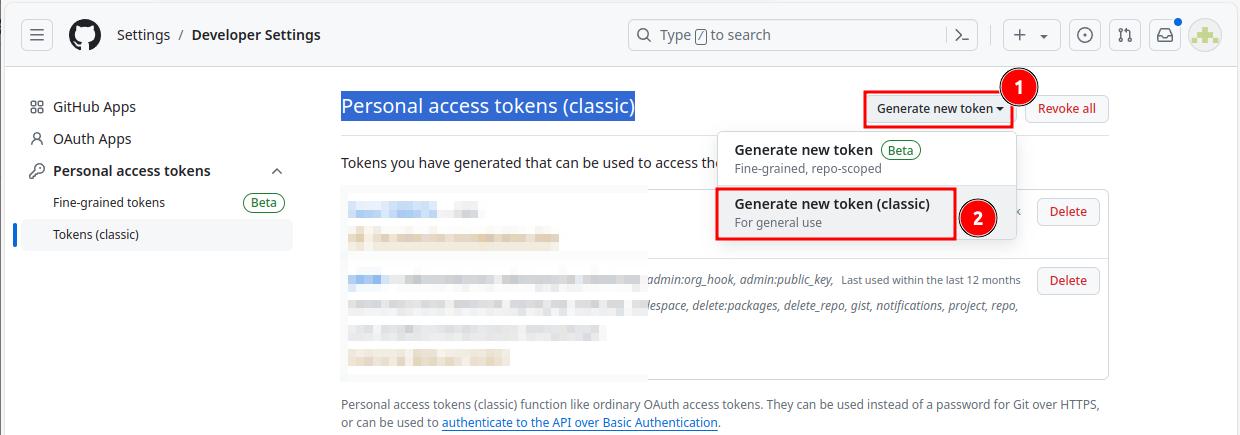
1.4.点击 Personal access tokens--->Tokens(classic),准备创建 Token, 如下图:
1.在 Personal access tokens (classic) 页面点击右侧的 Generate new token--->Generate new token(classic), 如图:
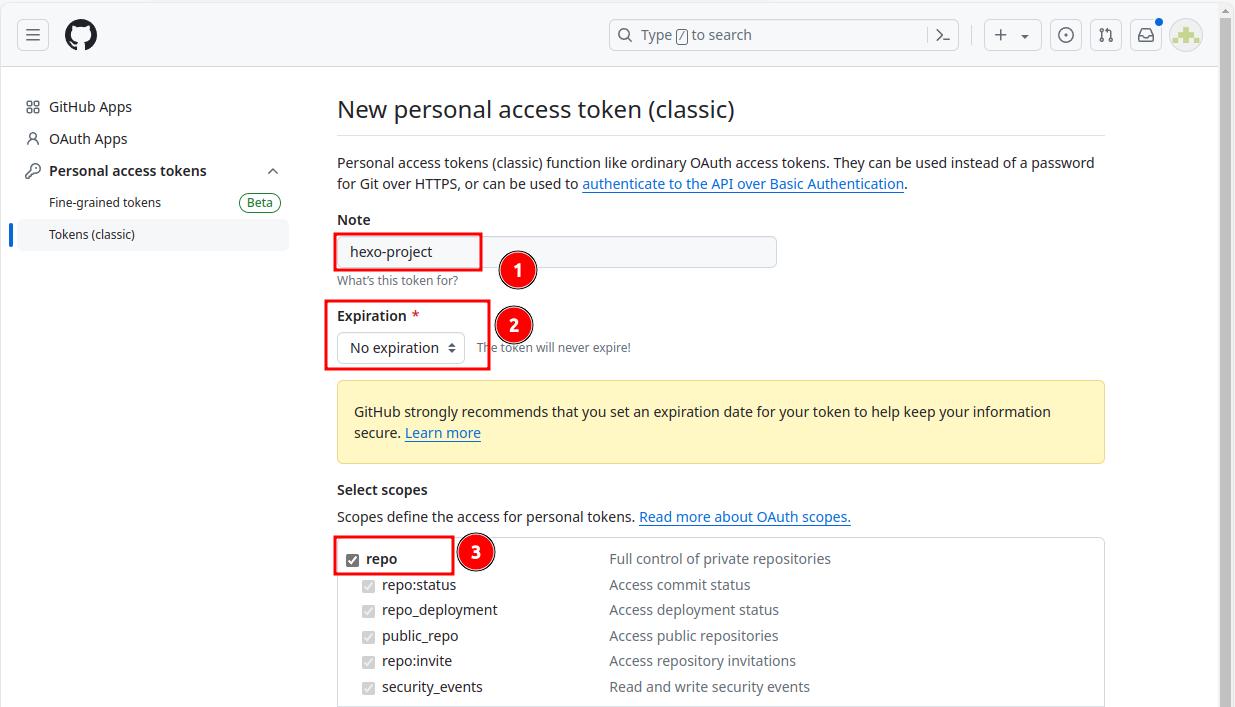
1.在 New personal access token (classic) 页面根据下图进行配置(特别是 Select scopes 只需要勾选 repo 即可),其它保持默认。最后点击下面的绿色 Generate token 按钮:
至此,Token 就生成好了。切记,该 Token (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) 需要及时复制起来保存(网页刷新或者关闭后,该 Token 内容就看不到了,只能删除后重新生成)

项目配置
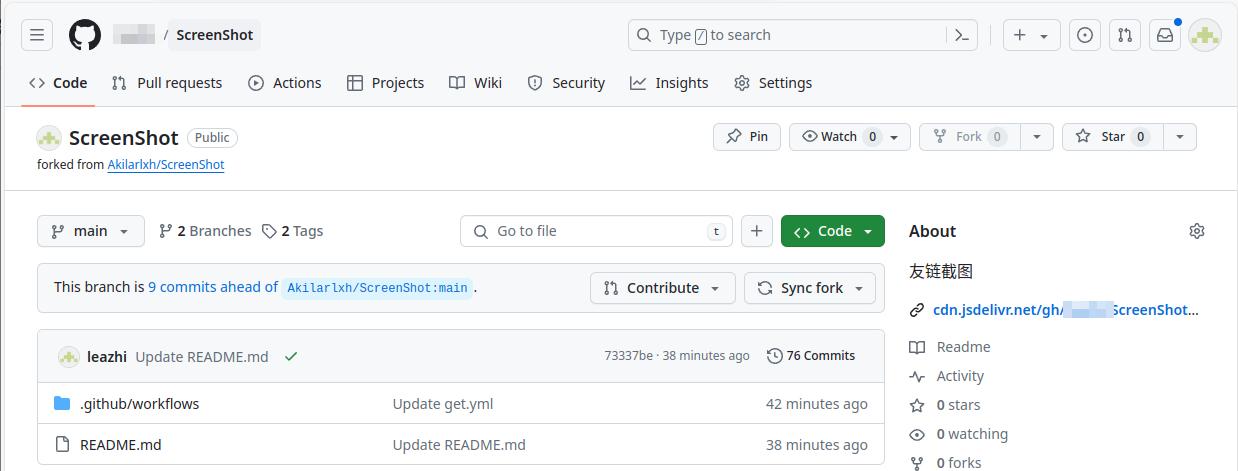
1.回到你刚刚 fork 过来的项目仓库,点击顶部导航栏中的 Settings ,如图:
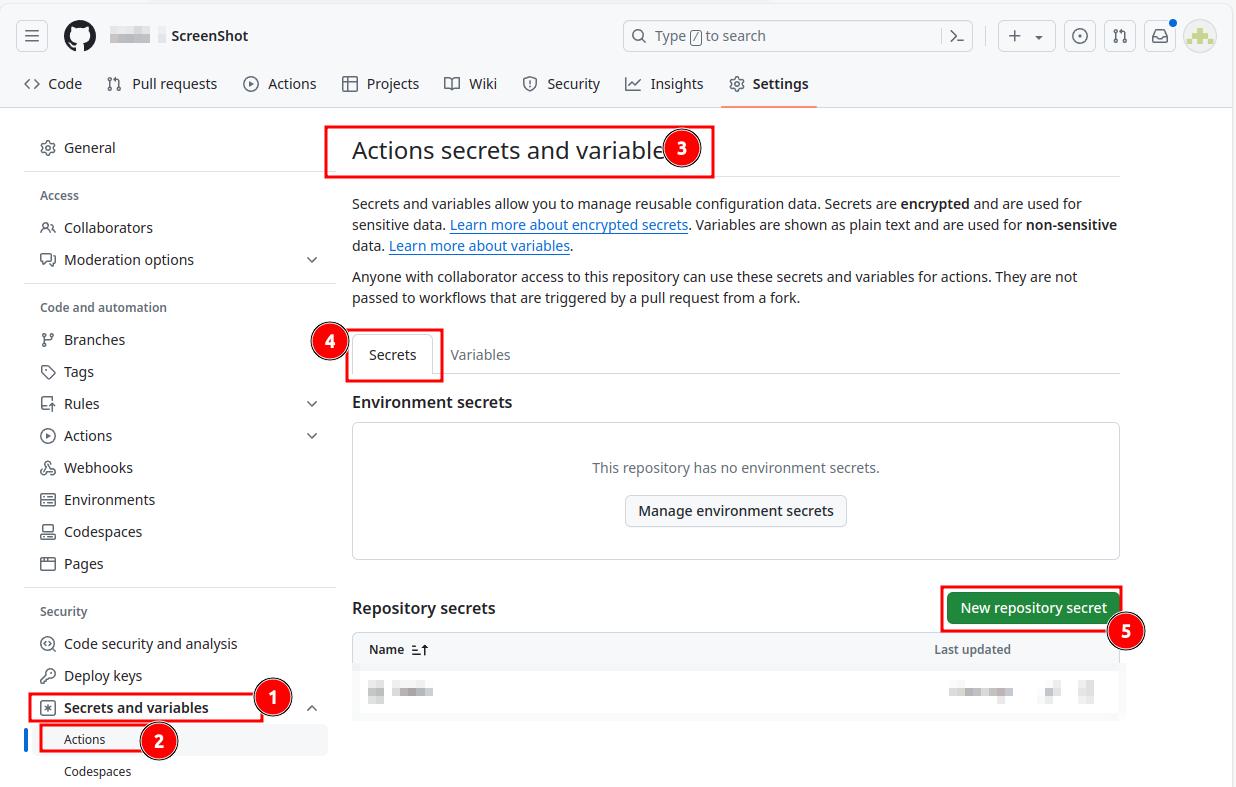
2.在 settings 页面点击左侧导航栏中的 Secrets and variables ---> Actions ,然后在右侧的 Actions secrets and variables 页面中点击 Secrets 选项,接着点击下面绿色的 New repository secret 按钮,如下图:
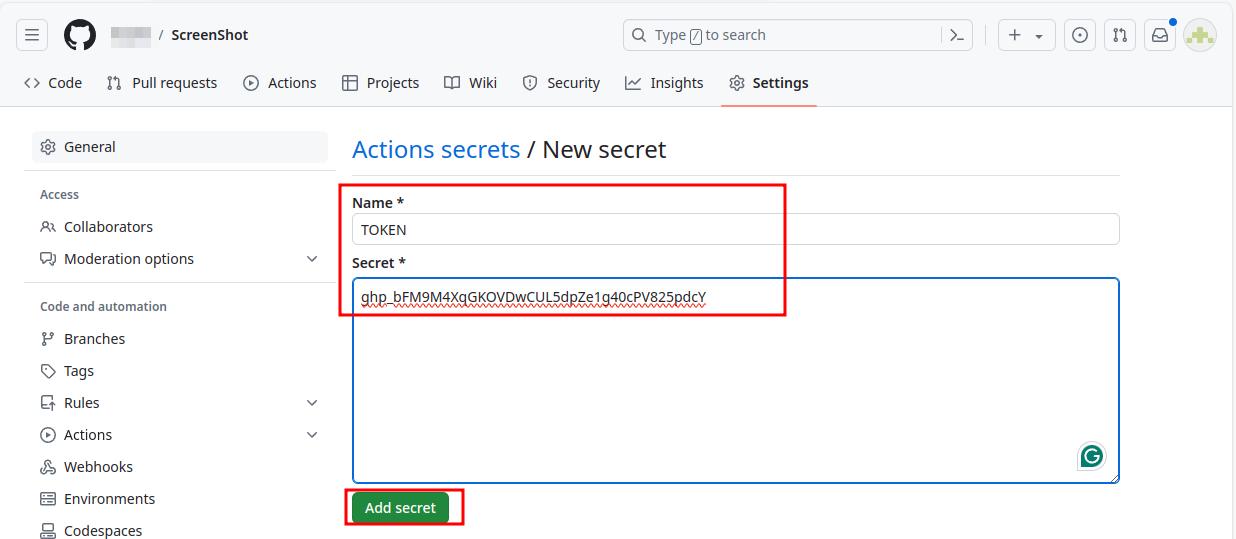
3.在 Actions secrets / New secret 页面中按下图格式输入(Name 名称必须为 TOKEN;Secrets 则为上面创建的 token 值 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):
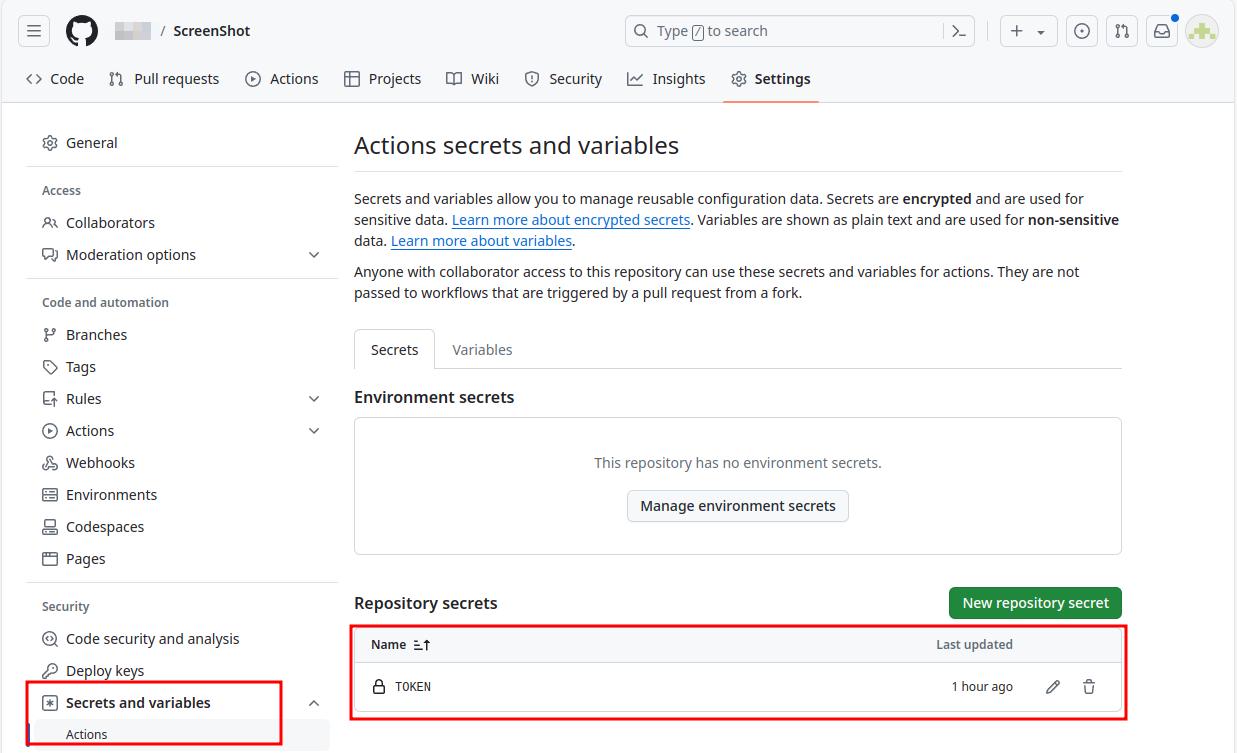
Secrets 创建完成后,可以在Secrets and variables ---> Actions 页面看到下面新建的 TOKEN:
代码修改
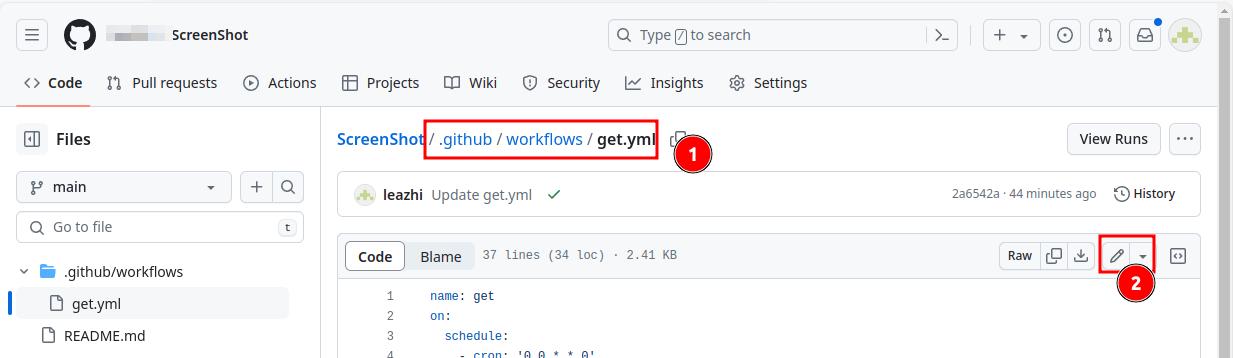
1.回到 fork 过来的仓库,依次展开仓库目录 .github-workflows ,然后点击 get.yml 文件,然后点击编辑按钮,如图:
2.按照代码中提供的格式,添加 curl 规则 ,同时需要注意修改 curl https://purge.jsdelivr.net/gh/[GithubUsername]/ScreenShot@gh-pages/*.* 中的 [GithubUsername] 为你自己 github 用户名,最后点击右上角绿色按钮 Commit changes,如图:
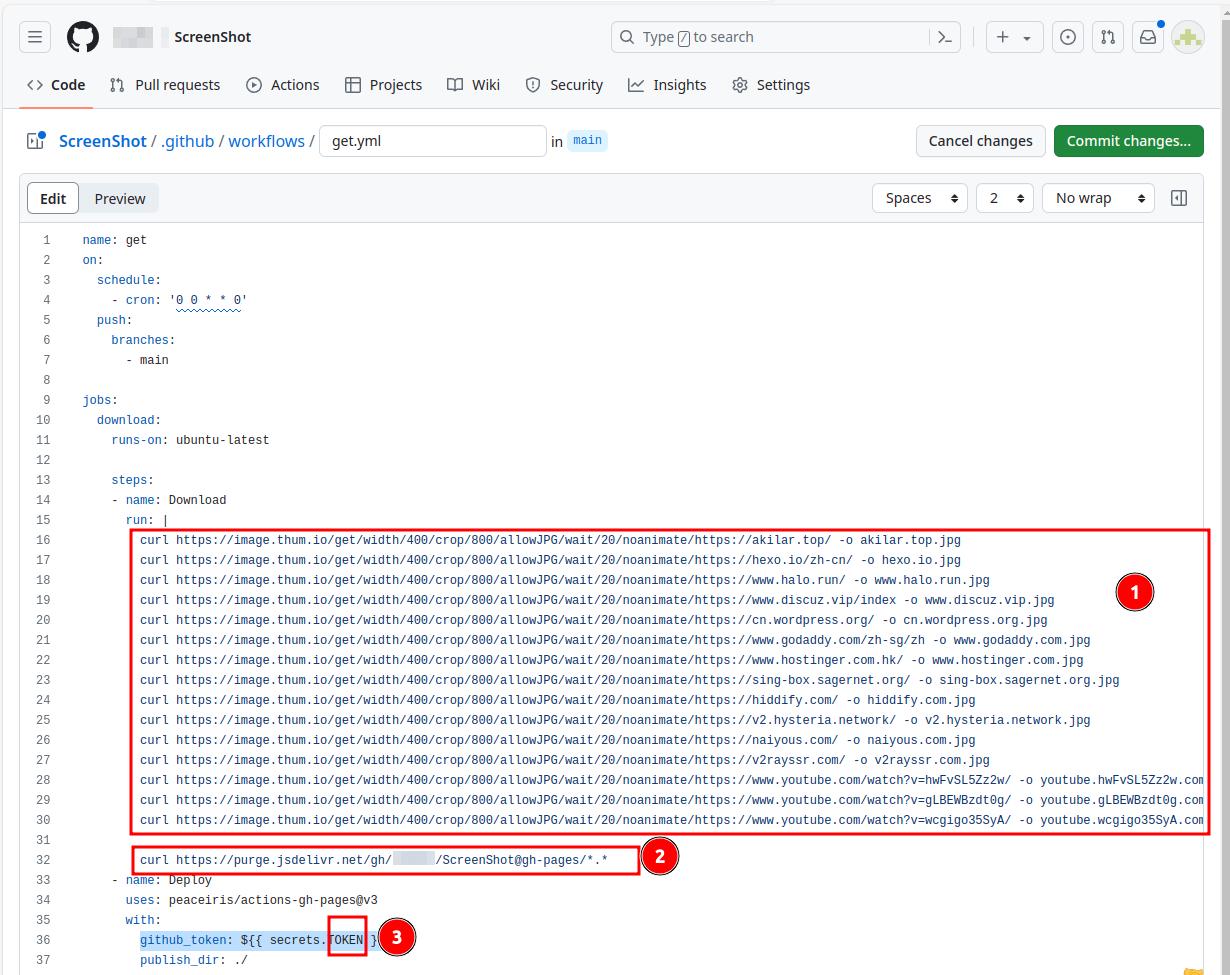
curl https://purge.jsdelivr.net/gh/GithubUsername/ScreenShot@gh-pages/*.* 代码中的 GithubUsername 改为你自己 github 账号;github_token: '$' 这里的 TOKEN 就是上面项目配置中的第 3 步在 Actions secrets / New secret 创建的 name 名称(两者必须一致);- 其它参数保持默认;
get.yml 内容
1
2
3
4
5
6
7
8
9
10
11
12
13
14
15
16
17
18
19
20
21
22
23
24
25
26
27
28
29
30
31
32
33
34
35
36
37
| name: get
on:
schedule:
- cron: '0 0 * * 0'
push:
branches:
- main
jobs:
download:
runs-on: ubuntu-latest
steps:
- name: Download
run: |
curl https://image.thum.io/get/width/400/crop/800/allowJPG/wait/20/noanimate/https://akilar.top/ -o akilar.top.jpg
curl https://image.thum.io/get/width/400/crop/800/allowJPG/wait/20/noanimate/https://hexo.io/zh-cn/ -o hexo.io.jpg
curl https://image.thum.io/get/width/400/crop/800/allowJPG/wait/20/noanimate/https://www.halo.run/ -o www.halo.run.jpg
curl https://image.thum.io/get/width/400/crop/800/allowJPG/wait/20/noanimate/https://www.discuz.vip/index -o www.discuz.vip.jpg
curl https://image.thum.io/get/width/400/crop/800/allowJPG/wait/20/noanimate/https://cn.wordpress.org/ -o cn.wordpress.org.jpg
curl https://image.thum.io/get/width/400/crop/800/allowJPG/wait/20/noanimate/https://www.godaddy.com/zh-sg/zh -o www.godaddy.com.jpg
curl https://image.thum.io/get/width/400/crop/800/allowJPG/wait/20/noanimate/https://www.hostinger.com.hk/ -o www.hostinger.com.jpg
curl https://image.thum.io/get/width/400/crop/800/allowJPG/wait/20/noanimate/https://sing-box.sagernet.org/ -o sing-box.sagernet.org.jpg
curl https://image.thum.io/get/width/400/crop/800/allowJPG/wait/20/noanimate/https://hiddify.com/ -o hiddify.com.jpg
curl https://image.thum.io/get/width/400/crop/800/allowJPG/wait/20/noanimate/https://v2.hysteria.network/ -o v2.hysteria.network.jpg
curl https://image.thum.io/get/width/400/crop/800/allowJPG/wait/20/noanimate/https://naiyous.com/ -o naiyous.com.jpg
curl https://image.thum.io/get/width/400/crop/800/allowJPG/wait/20/noanimate/https://v2rayssr.com/ -o v2rayssr.com.jpg
curl https://image.thum.io/get/width/400/crop/800/allowJPG/wait/20/noanimate/https://www.youtube.com/watch?v=hwFvSL5Zz2w/ -o youtube.hwFvSL5Zz2w.com.jpg
curl https://image.thum.io/get/width/400/crop/800/allowJPG/wait/20/noanimate/https://www.youtube.com/watch?v=gLBEWBzdt0g/ -o youtube.gLBEWBzdt0g.com.jpg
curl https://image.thum.io/get/width/400/crop/800/allowJPG/wait/20/noanimate/https://www.youtube.com/watch?v=wcgigo35SyA/ -o youtube.wcgigo35SyA.com.jpg
curl https://purge.jsdelivr.net/gh/GithubUsername/ScreenShot@gh-pages/*.*
- name: Deploy
uses: peaceiris/actions-gh-pages@v3
with:
github_token: ${{ secrets.TOKEN }}
publish_dir: ./
|
获取截图
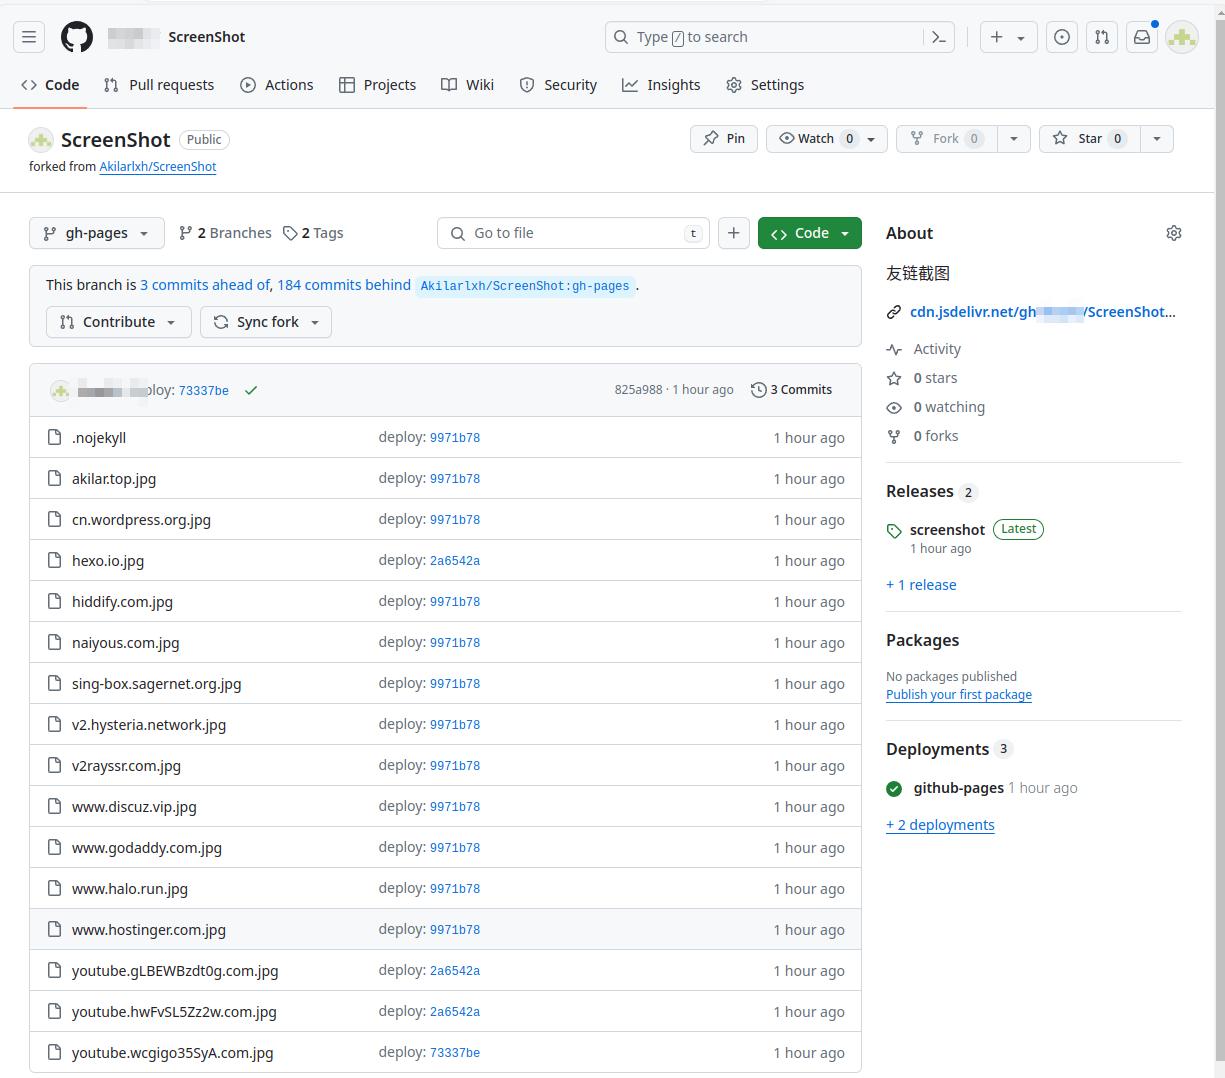
1.回到 fork 过来的项目仓库,此时我们点击仓库下面的 main ,将其切换到 gh-pages 分支,就可以看到上面网页的截图了,如图:
2.与此同时,我们也可以通过该地址 https://cdn.jsdelivr.net/gh/GithubUsername/ScreenShot@gh-pages/ 来访问我们的截图。
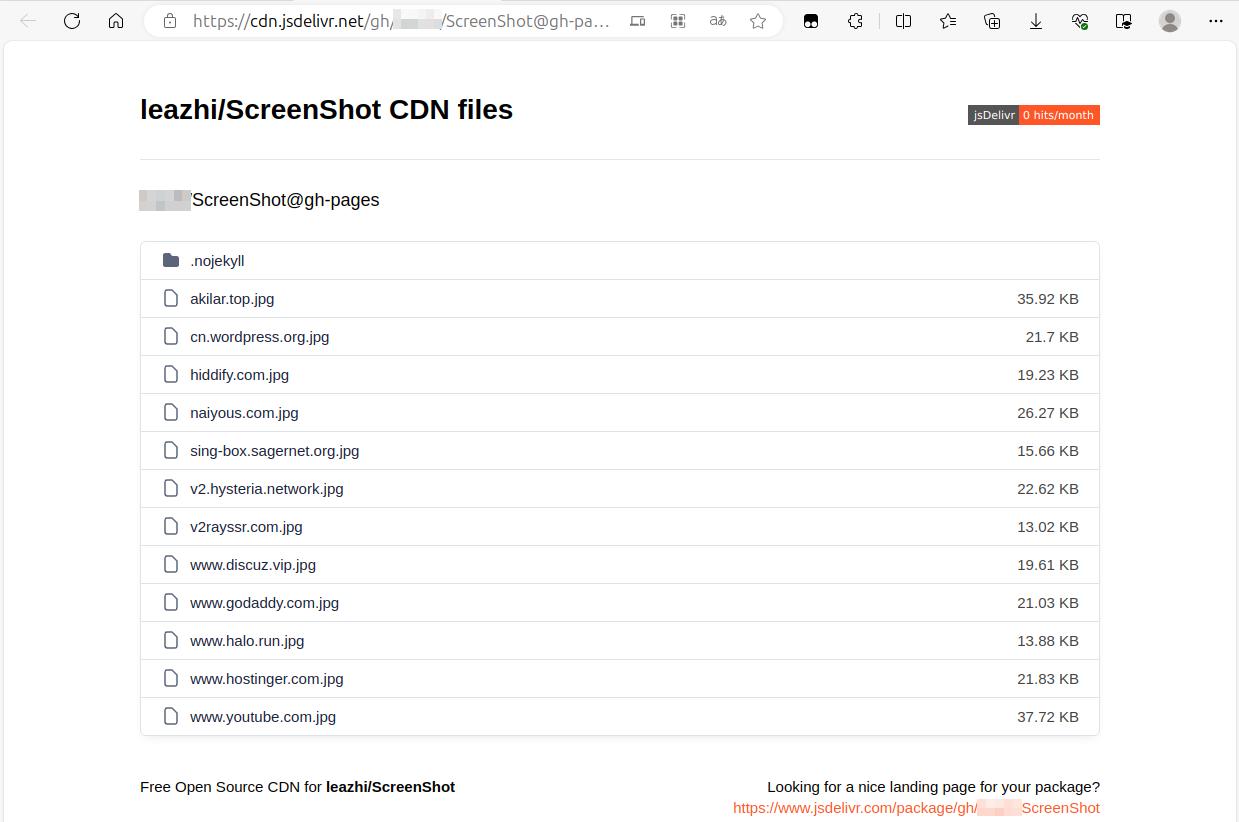
注意:cdn.jsdelivr.net 缓存刷新非常缓慢,但不影响图片的调用
使用
接下来,我们就可以在 [Blogroot]/source/_data/link.yml 中引用 https://cdn.jsdelivr.net/gh/GithubUsername/ScreenShot@gh-pages/ 里面的图片了,比如:
1
2
3
4
5
6
7
8
| - class_name: 博客项目
class_desc: 常见的博客项目
link_list:
- name: Hexo
link: https://hexo.io/zh-cn/
avatar: https://19880214.com/static/logos/log-hexo.png
descr: 快速、简洁且高效的博客框架
siteshot: https://19880214.com/static/siteshot/hexo.io.jpg
|
参考文档
akilar — Friend Link Card Beautify
thum.io — Free Website Screenshot Generator 使用文档