系统环境:
系统版本:CentOS-7-x86_64-Minimal-1908
内核版本:3.10.0-1062.el7.x86_64 #1 SMP Wed Aug 7 18:08:02 UTC 2019 x86_64 x86_64 x86_64 GNU/Linux
LNMP 架构介绍 LNMP 架构是一种常见的 Web 服务器架构,它由 Linux、Nginx、MySQL(或MariaDB)、PHP 组成。以下是 LNMP 架构的详细介绍:
Linux(操作系统):LNMP 架构的基础是 Linux 操作系统。Linux 是一个开源的、免费的操作系统,具有稳定性、安全性和灵活性。您可以选择适合您需求的 Linux 发行版,如 Ubuntu、CentOS 等。
Nginx(Web 服务器):Nginx 是一个高性能的开源 Web 服务器和反向代理服务器。它具有低内存消耗、高并发能力和出色的性能。Nginx 可以处理静态文件、动态内容和负载均衡,并提供 SSL/TLS 加密等功能。
MySQL(或MariaDB,数据库):MySQL 是一个流行的关系型数据库管理系统,用于存储和管理网站或应用程序的数据。它支持事务处理、复制和高可用性。MariaDB 是 MySQL 的一个分支,提供了与 MySQL 兼容的特性,并且在某些方面性能更好。
PHP(服务器端脚本语言):PHP 是一种广泛使用的服务器端脚本语言,用于开发动态网页和 Web 应用程序。它与 Nginx 配合使用,可以处理用户请求并生成动态内容。PHP 具有丰富的功能和大量的开发框架,如 Laravel、Symfony 等。
LNMP 架构的优点包括:
高性能:Nginx 和 PHP-FPM(PHP FastCGI 进程管理器)的组合可以提供高性能和良好的并发处理能力。
可扩展性:LNMP 架构可以轻松扩展以适应高流量和大规模应用程序的需求。
灵活性:通过 Nginx 的配置,可以实现负载均衡、反向代理、静态文件缓存等功能。
安全性:Nginx 提供了强大的安全功能,如访问控制、反向代理和 SSL/TLS 加密。
当然,LNMP 架构也有一些注意事项,如安全性配置、性能调优和合理的服务器资源分配等。在实际使用 LNMP 架构时,您还可以根据具体需求进行定制和扩展,以满足特定的应用程序需求。
LNMP 安装教程 安装前准备 1.安装扩展源 epel-release:
1 yum install -y epel-release && yum update -y
2.安装必要的 lnmp 依赖包:
1 yum install -y wget gcc gcc-c++ make autoconf automake unzip lrzsz vim epel-release systemd-devel systemtap-sdt-devel libxml2-devel openssl-devel bzip2-devel curl-devel libjpeg-devel libpng-devel libXpm-devel freetype-devel t1lib-devel gmp-devel libicu-devel libmcrypt-devel libedit-devel libxslt-devel gd-devel GeoIP-devel gperftools-devel libatomic_ops-devel
3.下载 openssl 和 zlib 源码包到 /usr/local/src/ 目录下并解压(注意:openssl 版本要大于 1.0.2,否则会出现编译错误;且两个软件都不需要编译安装,只要解压即可!):
3.1.openssl 下载解压:
1
2
wget -O /usr/local/src/openssl-1.1.1w.tar.gz https://www.openssl.org/source/openssl-1.1.1w.tar.gz tar -zxf /usr/local/src/openssl-1.1.1w.tar.gz -C /usr/local/src/
3.2.zlib 下载解压:
1
2
wget -O /usr/local/src/zlib.tar.gz https://www.zlib.net/current/zlib.tar.gz tar -zxf /usr/local/src/zlib.tar.gz -C /usr/local/src/
MySQL 安装 1.添加运行 mysql 的用户 mysql:
1 useradd -s /sbin/nologin mysql
2.创建 mysql 数据存放目录 /data/mysql 和日志存放目录 /var/lib/mysql:
1 mkdir -p /data/mysql /var/log/mysql
3.从 mysql 官方站点下载对应的 mysql 二进制版本文件到服务器的 /usr/local/src/ 目录下:
1 wget -O /usr/local/src/mysql-5.6.50-linux-glibc2.12-x86_64.tar.gz https://cdn.mysql.com/archives/mysql-5.6/mysql-5.6.50-linux-glibc2.12-x86_64.tar.gz
4.将下载好的二进制包解压到下载目录:
1 tar -zxf /usr/local/src/mysql-5.6.50-linux-glibc2.12-x86_64.tar.gz -C /usr/local/src/
5.将解压出来的 mysql 目录移动到 /usr/local/ 目录下并重命名为 mysql:
1 mv /usr/local/src/mysql-5.6.50-linux-glibc2.12-x86_64 /usr/local/mysql
6.进入 /usr/local/mysql 目录,执行初始化数据库的命令:
1 cd /usr/local/mysql/&& ./scripts /mysql_install_db --datadir=/data/mysql --user=mysql --skip-name-resolve
7.编辑 /etc/my.cnf 文件,将 mysql 主配置内容配置内容如下:
1 2 3 4 5 6 7 8 9 10 11 12 13 14 15 16 17 18 19 20 21 22 23 24 25 26 27 28 29 30 31 32 33 34 35 36 37 38 39 40 41 42 43 44 45 46 47 48 49 50 51 52 53 54 55 56 57 58 59 60 61 62 63 64 65 66 67 68 69 70 71 72 73 74 75 76 77 78 79 80 81 82 83 84 85 86 87 88 89 90 91 92 93 94 95 96 97 98 99 100 101 102 103 104 105 106 107 108 109 110 111 [mysqld] bind-address = 0.0.0.0 port = 3306 pid-file = /data/mysql/mysql.pid basedir = /usr/local/mysql/ datadir = /data/mysql socket=/tmp/mysql.sock character-set-server=utf8mb4 symbolic-link = 0 open_files_limit = 65535 log-error = /var/log/mysql/error.log slow_query_log=on long_query_time=2 slow_query_log_file = /var/log/mysql/slow_query.log log-queries-not-using-indexes = 1 default_storage_engine=InnoDB innodb_file_per_table = on innodb_buffer_pool_size=4G skip_name_resolve = on lower_case_table_names = 1 query_cache_type=1 query_cache_limit = 2M query_cache_size = 64M back_log = 500 max_connections = 1000 server_id=1 log_bin=mysql-bin expire_logs_days = 7 max_binlog_size = 100m binlog_cache_size = 4m max_binlog_cache_size = 512m [mysqldump] quick [mysql] auto-rehash default-character-set = utf8mb4 connect-timeout = 3 [client] default-character-set = utf8mb4 port = 3306 socket = /tmp/mysql.sock [mysqld_safe] open-files-limit = 8192
8.在 /lib/systemd/system/ 目录下创建 mysql.service 文件
1
2
3
4
5
6
7
8
9
10
11
12
13
14
15
16
17
18
[Unit] Description=MySQL Server Documentation=man:mysqld(8) Documentation=http://dev.mysql.com/doc/refman/en/using-systemd.html After=network.target After=syslog.target [Install] WantedBy=multi-user.target [Service] User=mysql Group=mysql ExecStart=/usr/local/mysql/bin/mysqld --defaults-file=/etc/my.cnf LimitNOFILE = 5000
9.将 mysql 的数据存放目录,日志存放目录,安装目录所属主和组都修改为 mysql:
1 chown -R mysql:mysql /data/mysql /var/log/mysql /usr/local/mysql
10.执行命令加载 mysql 启动脚本:
11.执行命令,启动 mysql 服务并将其加入到开机启动项:
1 systemctl enable --now mysql.service
12.执行命令,查看 mysql 服务状态:
1
2
3
4
5
6
7
8
9
10
11
12
13
14
15
16
[root@localhost mysql] ● mysql.service - MySQL Server Loaded: loaded (/usr/lib/systemd/system/mysql.service; enabled; vendor preset: disabled) Active: active (running) since Fri 2023-09-29 23:44:23 EDT; 29s ago Docs: man:mysqld(8) http://dev.mysql.com/doc/refman/en/using-systemd.html Main PID: 8494 (mysqld) CGroup: /system.slice/mysql.service └─8494 /usr/local/mysql/bin/mysqld --defaults-file=/etc/my.cnf Sep 29 23:44:23 localhost.localdomain systemd[1]: Started MySQL Server. Sep 29 23:44:23 localhost.localdomain mysqld[8494]: 2023-09-29 23:44:23 0 [Warning] Using unique option prefix symbolic-link instead of symbolic-links is depr... instead. Sep 29 23:44:23 localhost.localdomain mysqld[8494]: 2023-09-29 23:44:23 0 [Warning] TIMESTAMP with implicit DEFAULT value is deprecated. Please use --explicit...details). Sep 29 23:44:23 localhost.localdomain mysqld[8494]: 2023-09-29 23:44:23 0 [Note] --secure-file-priv is set to NULL. Operations related to importing and export ... disabled Sep 29 23:44:23 localhost.localdomain mysqld[8494]: 2023-09-29 23:44:23 0 [Note] /usr/local/mysql/bin/mysqld (mysqld 5.6.50-log ) starting as process 8494 ... Hint: Some lines were ellipsized, use -l to show in full.
PHP 安装 1.添加运行 php 的用户和用户组:
1 useradd -s /sbin/nologin php-fpm
2.到 php 官方站点在对应版本的 php 源码包到 /usr/local/src 目录下:
1 wget -O /usr/local/src/php-5.6.40.tar.gz https://www.php.net/distributions/php-5.6.40.tar.gz
3.将下载好的源码包解压到下载目录:
1 tar -zxf /usr/local/src/php-5.6.40.tar.gz -C /usr/local/src/
4.进入解压后的目录,配置 configure 参数:
1
2
3
4
5
6
7
8
9
10
11
12
13
14
15
16
17
18
19
20
21
22
23
24
25
26
27
28
29
30
31
32
33
34
35
36
37
38
39
40
41
42
43
44
45
46
47
48
49
50
51
52
53
54
cd /usr/local/src/php-5.6.40 && ./configure --prefix=/usr/local/php \--enable-mod-charset \ --enable-fpm \ --with-fpm-user=php-frpm \ --with-fpm-group=php-fpm \ --with-fpm-systemd \ --enable-phpdbg \ --with-config-file-path=/usr/local/php/etc \ --disable-ipv6 \ --enable-dtrace \ --with-libxml-dir \ --with-openssl \ --with-pcre-regex \ --with-zlib \ --enable-bcmath \ --with-bz2 \ --with-curl \ --enable-dba \ --enable-exif \ --with-pcre-dir \ --enable-ftp \ --with-gd \ --with-jpeg-dir \ --with-png-dir \ --with-zlib-dir \ --with-freetype-dir \ --with-xpm-dir \ --with-t1lib \ --enable-gd-native-ttf \ --enable-gd-jis-conv \ --with-gettext \ --with-gmp \ --with-mhash \ --enable-intl \ --enable-mbstring \ --with-libmbfl \ --with-onig \ --with-mcrypt \ --with-mysql=mysqlnd \ --with-mysqli=mysqlnd \ --enable-embedded-mysqli \ --enable-opcache \ --enable-pcntl \ --with-pdo-mysql=mysqlnd \ --with-libedit \ --enable-shmop \ --enable-soap \ --enable-sockets \ --enable-wddx \ --enable-zip \ --with-pcre-dir \ --enable-mysqlnd \ --enable-maintainer-zts \ --enable-zend-signals
5.执行 make 进行编译:
6.执行 make install 进行安装:
7.复制 php 的配置文件到 /usr/local/php/etc/ 目录下:
1
2
3
4
5
cp php.ini-production /usr/local/php/etc/php.inicp sapi/fpm/php-fpm.conf /usr/local/php/etc/php-fpm.confsed -i 's/php-frpm/php-fpm/' /usr/local/php/etc/php-fpm.conf sed -i 's@;pid = run/php-fpm.pid@pid = /var/run/php-fpm.pid@' /usr/local/php/etc/php-fpm.conf
8.在 /lib/systemd/system/ 目录下创建 php-fpm.service 文件:
1
2
3
4
5
6
7
8
9
10
11
12
13
[Unit] Description=The PHP FastCGI Process Manager After=syslog.target network.target [Service] Type=forking PIDFile=/var/run/php-fpm.pid ExecStart=/usr/local/php/sbin/php-fpm ExecReload=/bin/kill -USR2 $MAINPID PrivateTmp=true [Install] WantedBy=multi-user.target
9.执行命令加载 mysql 启动脚本:
10.执行命令,启动 mysql 服务并将其加入到开机启动项:
1 systemctl enable --now php-fpm.service
11.查看php-fpm.service 状态:
1
2
3
4
5
6
7
8
9
10
11
12
13
14
[root@localhost php-5.6.40] ● php-fpm.service - The PHP FastCGI Process Manager Loaded: loaded (/usr/lib/systemd/system/php-fpm.service; enabled; vendor preset: disabled) Active: active (running) since Fri 2023-09-29 23:56:00 EDT; 17s ago Process: 13710 ExecStart=/usr/local/php/sbin/php-fpm (code=exited, status=0/SUCCESS) Main PID: 13711 (php-fpm) CGroup: /system.slice/php-fpm.service ├─13711 php-fpm: master process (/usr/local/php/etc/php-fpm.conf) ├─13712 php-fpm: pool www └─13713 php-fpm: pool www Sep 29 23:56:00 localhost.localdomain systemd[1]: Starting The PHP FastCGI Process Manager... Sep 29 23:56:00 localhost.localdomain systemd[1]: Started The PHP FastCGI Process Manager. [root@localhost php-5.6.40]
Nginx 安装 1.添加运行 nginx 的用户和用户组:
1 useradd -s /sbin/nologin nginx
2.从 nginx 官方站点下载对应版本的 nginx 源码包到 /usr/local/src/ 目录下:
1 wget -O /usr/local/src/nginx-1.18.0.tar.gz https://nginx.org/download/nginx-1.18.0.tar.gz
3.将下载好的 nginx 源码包解压到下载目录:
1 tar -zxf /usr/local/src/nginx-1.18.0.tar.gz -C /usr/local/src/
4.进入解压目录,执行 configure 命令进行配置:
1
2
3
4
5
6
7
8
9
10
11
12
13
14
15
16
17
18
19
20
21
22
23
24
25
26
27
28
29
30
31
32
33
34
cd /usr/local/src/nginx-1.18.0/ && ./configure --prefix=/usr/local/nginx \--user=nginx \ --group=nginx \ --with-threads \ --with-http_ssl_module \ --with-http_v2_module \ --with-http_realip_module \ --with-http_addition_module \ --with-http_xslt_module=dynamic \ --with-http_image_filter_module=dynamic \ --with-http_geoip_module=dynamic \ --with-http_sub_module \ --with-http_dav_module \ --with-http_flv_module \ --with-http_mp4_module \ --with-http_gunzip_module \ --with-http_gzip_static_module \ --with-http_auth_request_module \ --with-http_random_index_module \ --with-http_secure_link_module \ --with-http_degradation_module \ --with-http_slice_module \ --with-http_stub_status_module \ --with-stream \ --with-stream_ssl_module \ --with-stream_realip_module \ --with-stream_geoip_module \ --with-stream_ssl_preread_module \ --with-google_perftools_module \ --with-compat \ --with-zlib=/usr/local/src/zlib-1.3 \ --with-pcre \ --with-libatomic \ --with-openssl=/usr/local/src/openssl-1.1.1w
5.执行编译及安装命令:
1 make -j $(nproc ) && make install
6.在 /lib/systemd/system/ 目录下创建 nginx.service 文件:
1
2
3
4
5
6
7
8
9
10
11
12
13
14
[Unit] Description=Nginx HTTP Serverlocal/nginx/ After=network.target [Service] Type=forking ExecStartPre=/usr/local/nginx/sbin/nginx -t ExecStart=/usr/local/nginx/sbin/nginx ExecReload=/usr/local/nginx/sbin/nginx -s reload ExecStop=/usr/local/nginx/sbin/nginx -s stop PrivateTmp=true [Install] WantedBy=multi-user.target
7.执行命令加载 mysql 启动脚本:
8.执行命令,启动 mysql 服务并将其加入到开机启动项:
1 systemctl enable --now nginx.service
9.设置防火墙,开放 80 端口:
1
2
3
[root@localhost nginx-1.18.0] success success
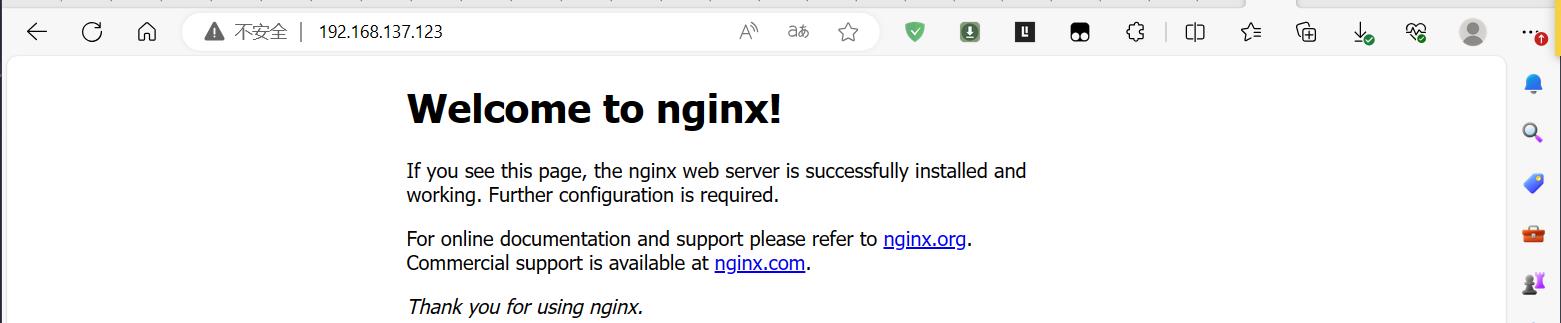
测试 基于 nginx 的测试 打开浏览器,输入服务器 IP,看能否正常访问到 nginx 欢迎页面。
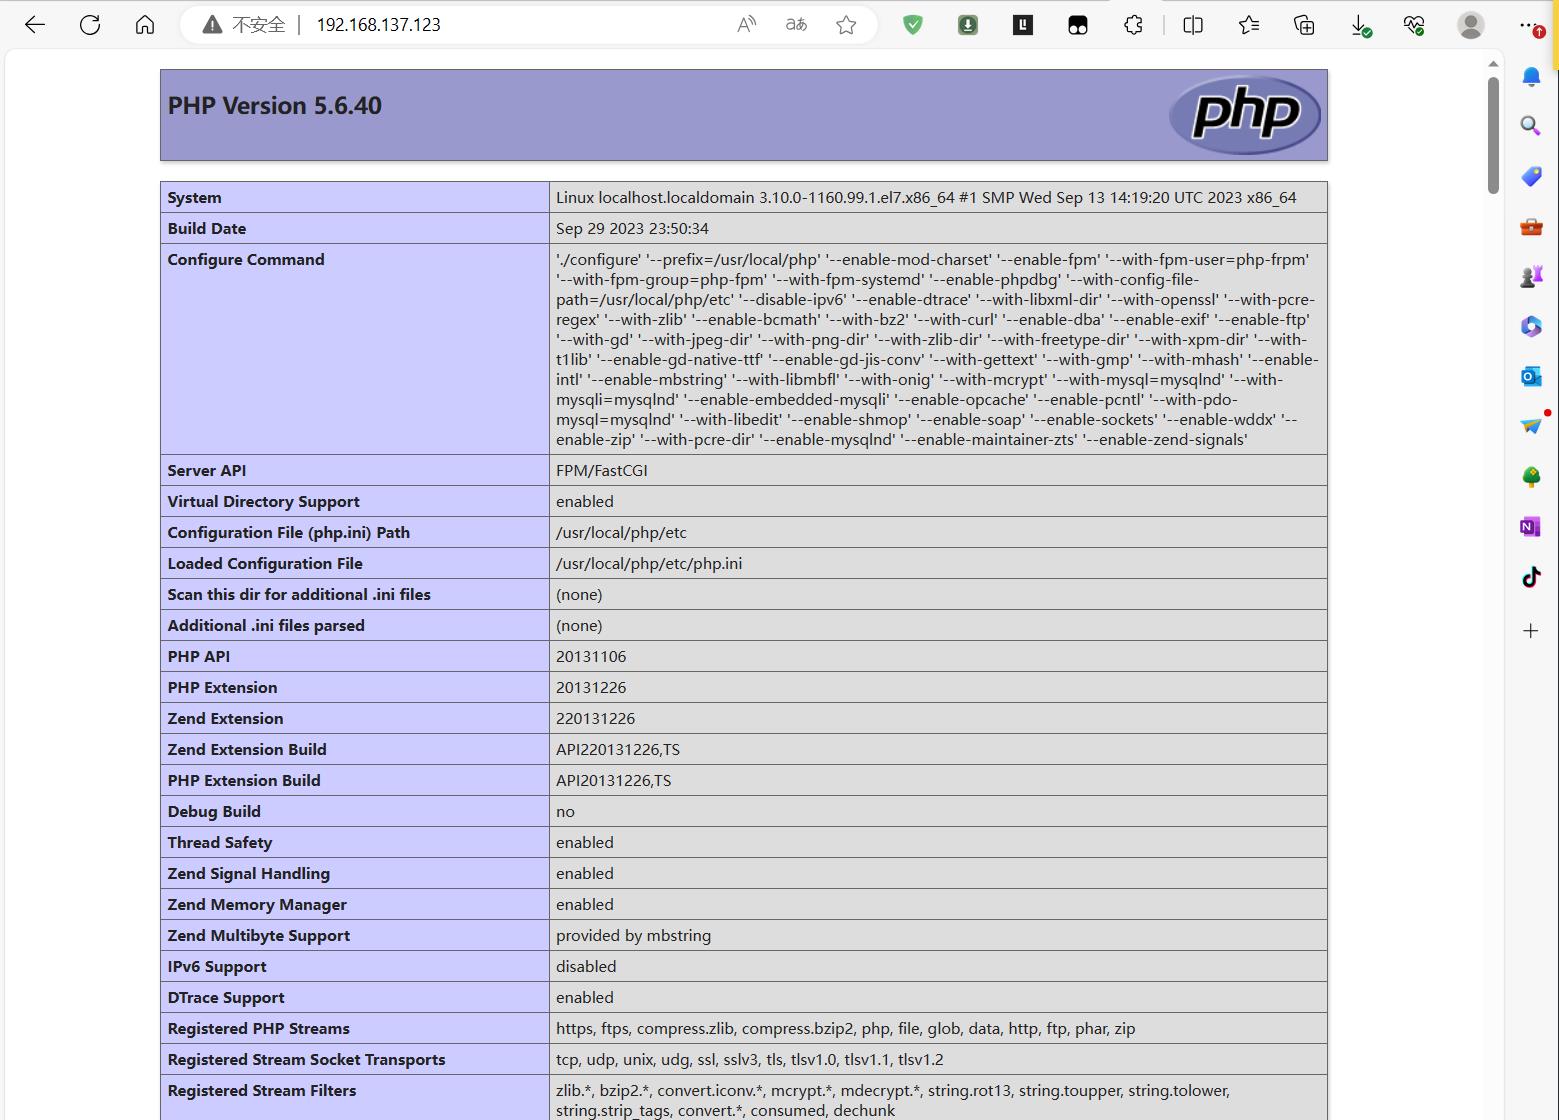
基于 lnmp 测试 1.在 /usr/local/nginx/html 目录下新建 index.php 文件,内容如下:
1
2
3
<?php echo phpinfo ();?>
2.编辑 /usr/local/nginx/conf/nginx.conf 文件,将 nginx 主配置文件修改如下:
1
2
3
4
5
6
7
8
9
10
11
12
13
14
15
16
17
18
19
20
21
22
23
24
25
26
27
28
29
30
[root@localhost nginx-1.18.0] worker_processes 1; events { worker_connections 1024; } http { include mime.types; default_type application/octet-stream; sendfile on; keepalive_timeout 65; server { listen 80; server_name localhost; location / { root html; index index.php; } error_page 500 502 503 504 /50x.html; location = /50x.html { root html; } location ~ \.php$ { root html; fastcgi_pass 127.0.0.1:9000; fastcgi_index index.php; fastcgi_param SCRIPT_FILENAME $document_root$fastcgi_script_name ; include fastcgi_params; } } }
3.执行命令,检查 nginx 配置文件是否正确:
1
2
3
[root@localhost nginx-1.18.0] nginx: the configuration file /usr/local/nginx/conf/nginx.conf syntax is ok nginx: configuration file /usr/local/nginx/conf/nginx.conf test is successful
4.重启 nginx 服务:
1 systemctl restart nginx.service
5.打开浏览器,输入服务器 IP,看能否正常访问到 phpinfo() 页面。
参考