系统环境

标题 版本 备注
系统版本 ubuntu 22.04.3 LTS (Jammy Jellyfish) -
内核版本 5.15.0-91-generic #98-Ubuntu SMP Mon Oct 2 15:18:56 UTC 2023 x86_64 x86_64 x86_64 GNU/Linux -
Tengine v3.1.0 -
PHP v7.4.30 -
MariaDB v10.11.7 -
WordPress v6.5.3 -

WordPress 简介

WordPress 官方网站: https://wordpress.com/support/com-vs-org/

WordPress Codex: https://wordpress.org/

WordPress 初学者指南: https://www.wpbeginner.com/

WordPress 是一款免费开源的内容管理系统 (CMS),由 PHP 和 MySQL 编写。它用于创建博客、网站和其他类型的在线内容。WordPress 是世界上最受欢迎的 CMS 之一,为超过 60% 的所有网站提供支持。

WordPress 的主要功能:

  • 易于使用: WordPress 旨在易于使用,即使是没有任何编码经验的初学者也可以使用。它提供了一个用户友好的界面以及各种插件和主题来扩展其功能。

  • 灵活且可定制: WordPress 具有高度的灵活性和可定制性。您可以使用主题轻松更改网站的外观和感觉,也可以使用插件添加新功能和功能。

  • 强大且可扩展: WordPress 是一款功能强大且可扩展的 CMS。它可以处理各种网站,从小型博客到大中型企业网站。

  • 拥有庞大的社区和支持: WordPress 拥有庞大且活跃的用户和开发人员社区。这意味着您可以获得大量资源来帮助您入门并解决遇到的任何问题。

使用 WordPress 的优势:

  • 易于创建和管理内容: WordPress 使得创建和管理内容(例如博客文章、页面和图像)变得容易。您可以简单地使用 Web 浏览器来编辑您的内容。

  • 无需编码: 您无需了解任何编码即可使用 WordPress。可以通过用户友好的界面完成所有操作。

  • 各种主题和插件: WordPress 可提供数千种免费和高级主题和插件。这使您可以自定义网站的外观和感觉并添加新功能。

  • 搜索引擎友好: WordPress 针对搜索引擎进行了优化,这可以帮助您的网站在搜索结果中排名更高。

  • 安全可靠: WordPress 是一款安全可靠的 CMS。定期发布更新以修复错误和安全漏洞。

总而言之,WordPress 是一款功能强大且通用的 CMS,是创建各种网站的绝佳选择。它易于使用、灵活,并拥有庞大的用户和开发人员社区。如果您正在寻找一个 CMS 来创建您的下一个网站,我强烈推荐 WordPress。

LTMP 环境部署

关于 LTMP 环境中的 Tengine 安装,请参考:在 ubuntu 22.04 中,通过源码编译安装 LTMP 中的 Tengine 服务(不支持 Lua 脚本语言)

关于 wordpress 虚拟主机的配置如下:

1
2
3
4
5
6
7
8
9
10
11
12
13
14
15
16
17
server {
listen 80;
server_name _;

location / {
root /data/website/wordpress/wordpress;
index index.php;
}

location ~ \.php$ {
root /data/website/wordpress/wordpress;
fastcgi_pass 127.0.0.1:9000;
fastcgi_index index.php;
fastcgi_param SCRIPT_FILENAME $document_root$fastcgi_script_name;
include fastcgi_params;
}
}

关于 LTMP 环境中的 MariaDB 安装,请参考:在 ubuntu 22.04 中,通过二进制安装 MariaDB 服务

关于 wordpress 数据库的创建及授权如下:

1
2
3
4
5
6
7
8
9
10
11
12
13
14
15
16
17
18
19
20
21
22
23
24
25
26
-- 登陆数据库
root@instance-2UkeKOzr:~# mysql -uroot -p
Enter password:
Welcome to the MariaDB monitor. Commands end with ; or \g.
Your MariaDB connection id is 37
Server version: 10.11.7-MariaDB MariaDB Server

Copyright (c) 2000, 2018, Oracle, MariaDB Corporation Ab and others.

Type 'help;' or '\h' for help. Type '\c' to clear the current input statement.

-- 创建数据库
MariaDB [(none)]> create database wordpress;
Query OK, 1 row affected (0.002 sec)

-- 授权
MariaDB [(none)]> grant all privileges on wordpress.* to 'wordpress'@'127.0.0.1' identified by 'wordpress2024';
Query OK, 0 rows affected (0.004 sec)

-- 使授权立即生效
MariaDB [(none)]> flush privileges;
Query OK, 0 rows affected (0.002 sec)

-- 退出数据库
MariaDB [(none)]> exit
Bye

关于 LTMP 环境中的 PHP 安装,请参考:在 ubuntu 22.04 中,通过源码编译安装 LNMP 中的 PHP 环境

WordPress 安装

1.点击这里下载 wordpress 源码文件到服务器指定目录(比如我这里将 wordpress 下载在 /data/website/wordpress 目录下)

1
wget -O /data/website/wordpress/lastet.zip https://wordpress.org/latest.zip

2.将下载好的源码文件解压到下载目录:

1
unzip /data/website/wordpress/latest.zip -d /data/website/wordpress/

3.打开浏览器,输入服务器IP,如图:

4.输入上面创建的 wordpress 数据库连接信息,如图:

5.按照提示,在服务器 wordpress 根目录下创建 wp-config.php 文件,内容如下:

1
2
3
4
5
6
7
8
9
10
11
12
13
14
15
16
17
18
19
20
21
22
23
24
25
26
27
28
29
30
31
32
33
34
35
36
37
38
39
40
41
42
43
44
45
46
47
48
49
50
51
52
53
54
55
56
57
58
59
60
61
62
63
64
65
66
67
68
69
70
71
72
73
74
75
76
77
78
79
80
81
82
83
84
85
86
87
88
89
90
91
92
93
94
95
96
<?php
/**
* The base configuration for WordPress
*
* The wp-config.php creation script uses this file during the installation.
* You don't have to use the website, you can copy this file to "wp-config.php"
* and fill in the values.
*
* This file contains the following configurations:
*
* * Database settings
* * Secret keys
* * Database table prefix
* * ABSPATH
*
* @link https://wordpress.org/documentation/article/editing-wp-config-php/
*
* @package WordPress
*/

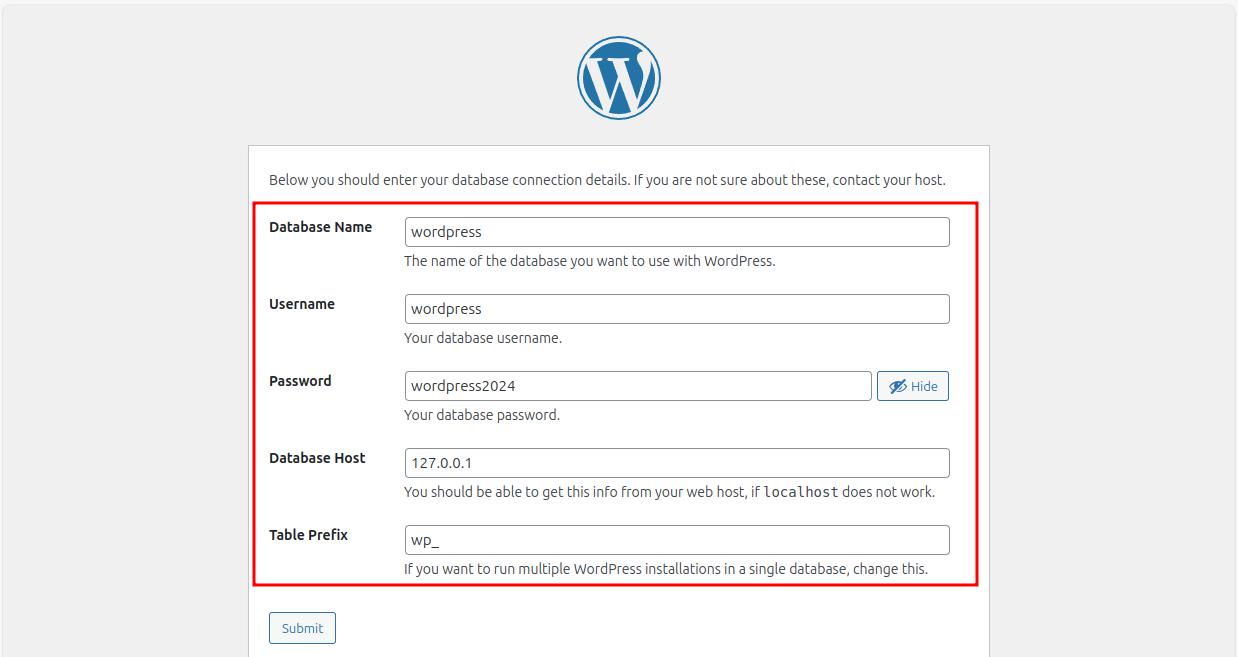
// ** Database settings - You can get this info from your web host ** //
/** The name of the database for WordPress */
define( 'DB_NAME', 'wordpress' );

/** Database username */
define( 'DB_USER', 'wordpress' );

/** Database password */
define( 'DB_PASSWORD', 'wordpress2024' );

/** Database hostname */
define( 'DB_HOST', '127.0.0.1' );

/** Database charset to use in creating database tables. */
define( 'DB_CHARSET', 'utf8mb4' );

/** The database collate type. Don't change this if in doubt. */
define( 'DB_COLLATE', '' );

/**#@+
* Authentication unique keys and salts.
*
* Change these to different unique phrases! You can generate these using
* the {@link https://api.wordpress.org/secret-key/1.1/salt/ WordPress.org secret-key service}.
*
* You can change these at any point in time to invalidate all existing cookies.
* This will force all users to have to log in again.
*
* @since 2.6.0
*/
define( 'AUTH_KEY', 'J~O^g!CVOs&{4zBV}G4-L*dAX4n<Hc19z^IRD&J5q>1uHI4elId%F<m6B&V]&[f]' );
define( 'SECURE_AUTH_KEY', '/XTQ):ZFFK]i{qO_OY^-HPgR{O|u<TTDPRs5*$)|lGwZt,0}e:I!7S]Yhzf~MwV~' );
define( 'LOGGED_IN_KEY', 'uW8,RX.x;X!v+j;i7~!$J:qh^(ywV~2{x:^r,07`uzUH;uE@HMS2k<O}K1h~h:UG' );
define( 'NONCE_KEY', '7|4/Ek2.?RMIw2WuRtlQ2xwnkw9a&R~?Mh*H.,swH<H{`(A@}LTPq/dUJgNtNbw)' );
define( 'AUTH_SALT', 'uSP,OVNUle>V{j^&D!)Qk%1qv#dLb{O`xNU<8-[NE0Cs+5wg5SR4nr%Aow,BlpiC' );
define( 'SECURE_AUTH_SALT', 'gjR&y!dDqHfW )w0U*16n>a5cix-&Z!vi{XBelt]GOX6P]%w$HN$8.`rWi)[:aF2' );
define( 'LOGGED_IN_SALT', '&oxU^~*UpWooSV/E*4_sXTg;1<vn*||2IO0:34~c>03{gt^B$pP3yQMk`-TQnd/)' );
define( 'NONCE_SALT', 'mjPGV&lj()V@]U18MD.K.:`)q/2T,+@a)7ZpeCL}=rb4G@P@hNpWnQ|>V53p{(WN' );

/**#@-*/

/**
* WordPress database table prefix.
*
* You can have multiple installations in one database if you give each
* a unique prefix. Only numbers, letters, and underscores please!
*/
$table_prefix = 'wp_';

/**
* For developers: WordPress debugging mode.
*
* Change this to true to enable the display of notices during development.
* It is strongly recommended that plugin and theme developers use WP_DEBUG
* in their development environments.
*
* For information on other constants that can be used for debugging,
* visit the documentation.
*
* @link https://wordpress.org/documentation/article/debugging-in-wordpress/
*/
define( 'WP_DEBUG', false );

/* Add any custom values between this line and the "stop editing" line. */


/* That's all, stop editing! Happy publishing. */

/** Absolute path to the WordPress directory. */
if ( ! defined( 'ABSPATH' ) ) {
define( 'ABSPATH', __DIR__ . '/' );
}

/** Sets up WordPress vars and included files. */
require_once ABSPATH . 'wp-settings.php';

然后点击 Run the installation 按钮,如图:

6.在 Welcome 安装页面按照提示输入网站标题、管理员账号、密码(UAVLjvmZT0jdIf5V30)及邮箱地址,然后点击 Install WordPress 按钮,如图:

7.进入 Sucess! 安装成功页面后,我们直接点击 Log In ,如图:

8.输入账号密码进行登陆,如图:

登陆后的管理后台,如图:

需要注意的是: 管理后台 URL 为:IP/wp-admin 或者 domain/wp-admin